Overview
This project does something detection alone cannot: instead of drawing a box around an object, it traces the object's exact outline, pixel by pixel. That is instance segmentation - and with Ultralytics YOLOv8 it takes surprisingly little code.
The script reads a video frame by frame, runs YOLOv8's segmentation model on each frame, pulls out the mask for every detected object, turns that mask into a contour, and draws the outline in green with a stable tracking ID floating above it. The result is a live silhouette that follows the object's real shape as it moves.
This is the natural next step after the Computer Vision with OpenCV & YOLOv8 project, which covers detection, counting and the OpenCV basics this builds on.
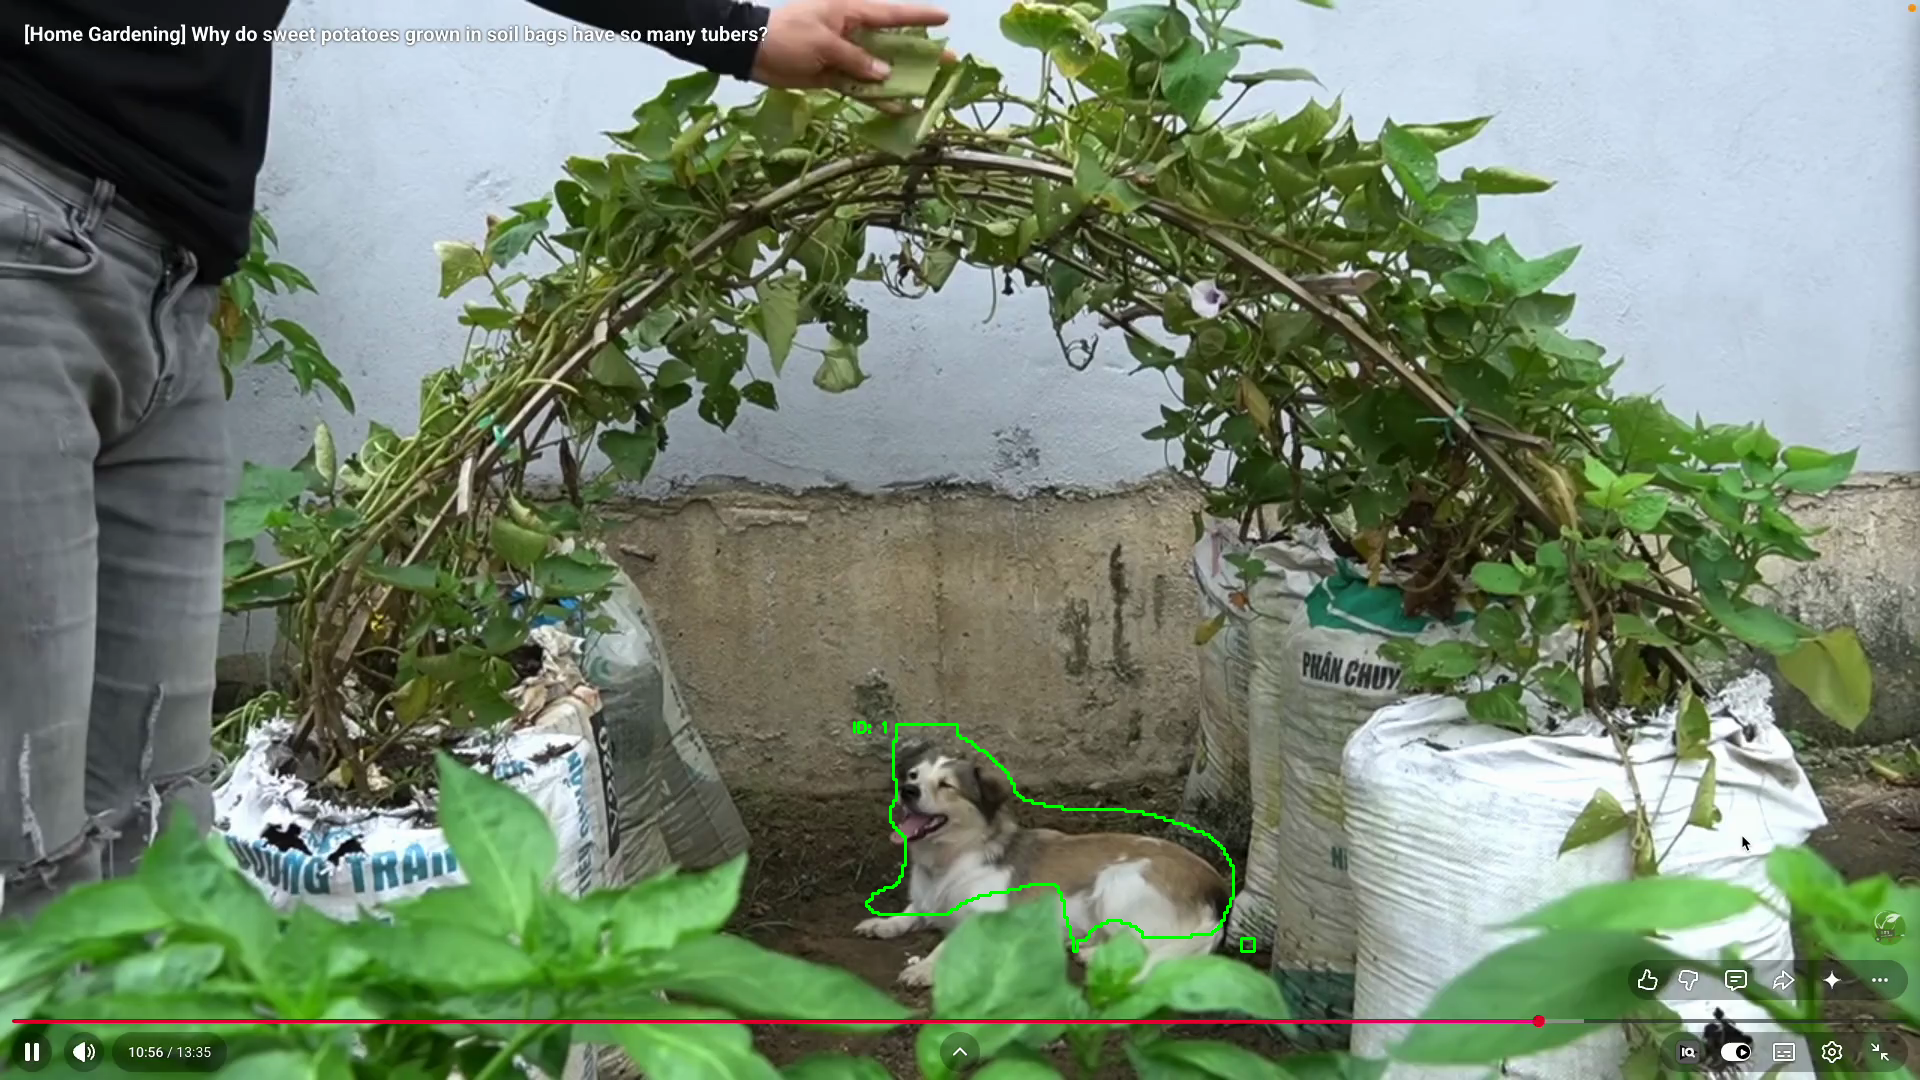
Instance segmentation in action - the model finds the dog, traces its exact outline (not just a box) and assigns it a tracking ID that stays stable across frames. This is real output from running the script below.
A few core concepts first
Before the code, the three ideas this project rests on.
Detection vs segmentation - box vs mask
- A bounding box is the simple answer to where: a rectangle
(x1, y1, x2, y2)around the object. Detection gives you boxes. - A mask is the far richer answer to which pixels: a pixel-perfect map of the object's exact shape. Segmentation gives you masks. The difference is "there's a dog roughly here" versus "these exact pixels are the dog".
To get masks instead of just boxes, we load the segmentation weights
(yolov8n-seg.pt) rather than the plain detection weights.
Mask → contour
YOLOv8 hands back each mask as a grid of 0s and 1s (background vs object).
To draw that as a clean outline we convert it into a contour - the list of
points that trace the boundary of the white region - with OpenCV's
findContours, then stroke that contour in green. So the pipeline is:
mask (0/1 grid) → black-and-white image → contour → green outline.
Tracking with a persistent ID
Plain detection treats every frame independently, so it has no idea the dog in
frame 1 is the same dog in frame 50. Tracking (model.track(..., persist=True))
adds memory: it assigns each object an ID and keeps it stable across frames.
That is why each outline below carries a steady ID: label instead of a number
that flickers every frame.
The model is pre-trained on the COCO dataset (80 classes). Here I filter to
classes=[16], which is COCO's dog class, so only dogs are segmented and everything else is ignored.
The full script
The complete program - read a video, segment each frame, and draw the tracked outlines. The walkthrough underneath takes it line by line.
import cv2
import os
import numpy as np
from ultralytics import YOLO

model= YOLO("yolov8n-seg.pt")

VIDEO_PATH = os.path.join(os.path.dirname(os.path.abspath(__file__)), "test-agri.mp4")

cap= cv2.VideoCapture(VIDEO_PATH)

while True:
    ret, frame=cap.read()
    if not ret:
        break
    results=model.track(frame, classes=[16],persist=True)
    for r in results:
        annoted_frame= frame.copy()
        if r.masks is not None and r.boxes is not None and r.boxes.id is not None:
            masks =r.masks.data.cpu().numpy()
            boxes=r.boxes.data.cpu().numpy()
            ids=r.boxes.id.cpu().numpy()
            for i,mask in enumerate(masks):
                dog_id=int(ids[i])
                mask_resized=cv2.resize(mask.astype(np.uint8)*255, (frame.shape[1], frame.shape[0]))
                x1,y1,x2,y2=boxes[i][:4].astype(int) # bounding box coordinates
                contours,_=cv2.findContours(mask_resized, cv2.RETR_EXTERNAL, cv2.CHAIN_APPROX_SIMPLE)
                cv2.drawContours(annoted_frame, contours, -1, (0,255,0), thickness=2)
                cv2.putText(annoted_frame, f"ID: {dog_id}", (x1, y1-10), cv2.FONT_HERSHEY_SIMPLEX, 0.5, (0,255,0), 2)
    cv2.imshow("Segmentation", annoted_frame)
    if cv2.waitKey(1) & 0xFF == ord('q'):
        break
cap.release()
cv2.destroyAllWindows()
Line by line
Setup
import cv2, os, numpy as npandfrom ultralytics import YOLObring in OpenCV (frames, drawing),os(build the video path), NumPy (the array type behind every mask) and YOLOv8.YOLO("yolov8n-seg.pt")loads the segmentation weights - same YOLOv8 family as detection, but this one predicts masks, not just boxes. The-segin the filename is the whole difference.os.path.join(os.path.dirname(os.path.abspath(__file__)), "test-agri.mp4")builds the video path relative to the script file, so it runs from any working directory.cv2.VideoCapture(VIDEO_PATH)opens the video for frame-by-frame reading.
The frame loop
ret, frame = cap.read()grabs the next frame;retsays whether it worked.if not ret: breakexits cleanly when the video ends.model.track(frame, classes=[16], persist=True)is the core call. It segments the frame, keeps only dogs (classes=[16]), andpersist=Truemakes the tracker remember objects between frames so their IDs stay stable.for r in results:iterates the result (one per frame).annoted_frame = frame.copy()draws on a fresh copy of the frame each time, so old outlines don't smear across into later frames.if r.masks is not None and r.boxes is not None and r.boxes.id is not None:is a three-part guard - masks, boxes and tracking IDs must all exist before we touch them, otherwise the first few frames (before the tracker locks on) would crash.
Per-object drawing
masks = r.masks.data.cpu().numpy()etc. pull the masks, boxes and IDs off the GPU/tensor into plain NumPy arrays we can loop over.for i, mask in enumerate(masks):walks each detected object;enumerategives both the indexiand themask.dog_id = int(ids[i])reads this object's stable tracking ID.mask.astype(np.uint8) * 255turns the mask's0/1values into a proper black-and-white image (0or255), andcv2.resize(..., (frame.shape[1], frame.shape[0]))scales it up to the full frame size - the model outputs masks at a lower resolution than the video.x1, y1, x2, y2 = boxes[i][:4].astype(int)reads the bounding-box corners, used only to place the text label.cv2.findContours(mask_resized, cv2.RETR_EXTERNAL, cv2.CHAIN_APPROX_SIMPLE)traces the outer outline of the white mask.RETR_EXTERNALkeeps only the outermost contour;CHAIN_APPROX_SIMPLEcompresses straight runs of points into just their endpoints.cv2.drawContours(annoted_frame, contours, -1, (0,255,0), thickness=2)strokes every contour in green --1means "draw all of them", and(0,255,0)is green in OpenCV's BGR colour order.cv2.putText(annoted_frame, f"ID: {dog_id}", (x1, y1-10), ...)writes the tracking ID just above the object.
Showing and cleanup
cv2.imshow("Segmentation", annoted_frame)displays the annotated frame.if cv2.waitKey(1) & 0xFF == ord('q'): breakwaits 1 ms for a key and quits onq- the standard way to make a real-time OpenCV window closable.cap.release()andcv2.destroyAllWindows()free the video and close the window when the loop ends.
Key insight
Segmentation is detection's richer cousin: swap yolov8n.pt for yolov8n-seg.pt,
read r.masks instead of just r.boxes, and you go from "a dog is roughly
here" to "these exact pixels are the dog". The only real handwork is turning
the raw mask into something drawable - resize it to full frame size, then
findContours + drawContours - and pairing it with track(persist=True) so
each silhouette carries a stable ID.
A practical note: the model is only as good as its training data. On the COCO classes it works out of the box, but the masks can wobble on unusual scenes or partially hidden objects. For domain-specific work (crops, tools, medical imagery) the next step is training YOLOv8-seg on your own labelled masks.
Tech stack
- Python 3.12
- Ultralytics YOLOv8 -
yolov8n-seg.ptpre-trained segmentation weights - OpenCV (
cv2) - video I/O,findContours,drawContours,putText, display - NumPy - the array type behind every mask
- Built-in tracker (
model.track(persist=True)) - persistent per-object IDs - COCO pre-trained classes - dog (
16) used here
Reference
- Ultralytics YOLOv8 - Segmentation - Instance Segmentation docs
- OpenCV - Contours - Contours: Getting Started
- COCO dataset - Common Objects in Context